September 3, 2017: Cinnamon Bun Apple Pie

First off, I would like to announce that The Munching Dead has made a $10 donation to the Hurricane Harvey relief fund run by the American Red Cross. We’d donate more but really, at this point, it’s a one person operation here and I don’t make any money from this, it’s a passion project. We do look forward to donating more in the upcoming weeks. Thoughts go out to everyone in the path.
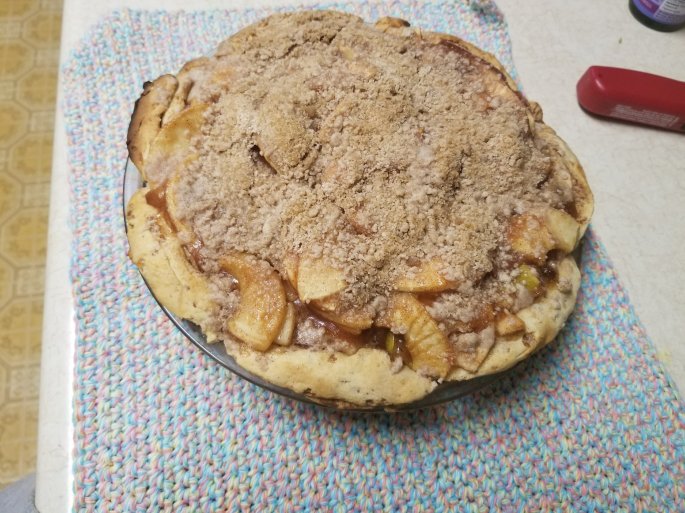
This week’s recipe is something I thought I’d give a try with the idea that, if it failed, it’s still be delicious. It was a success and is indeed delicious.
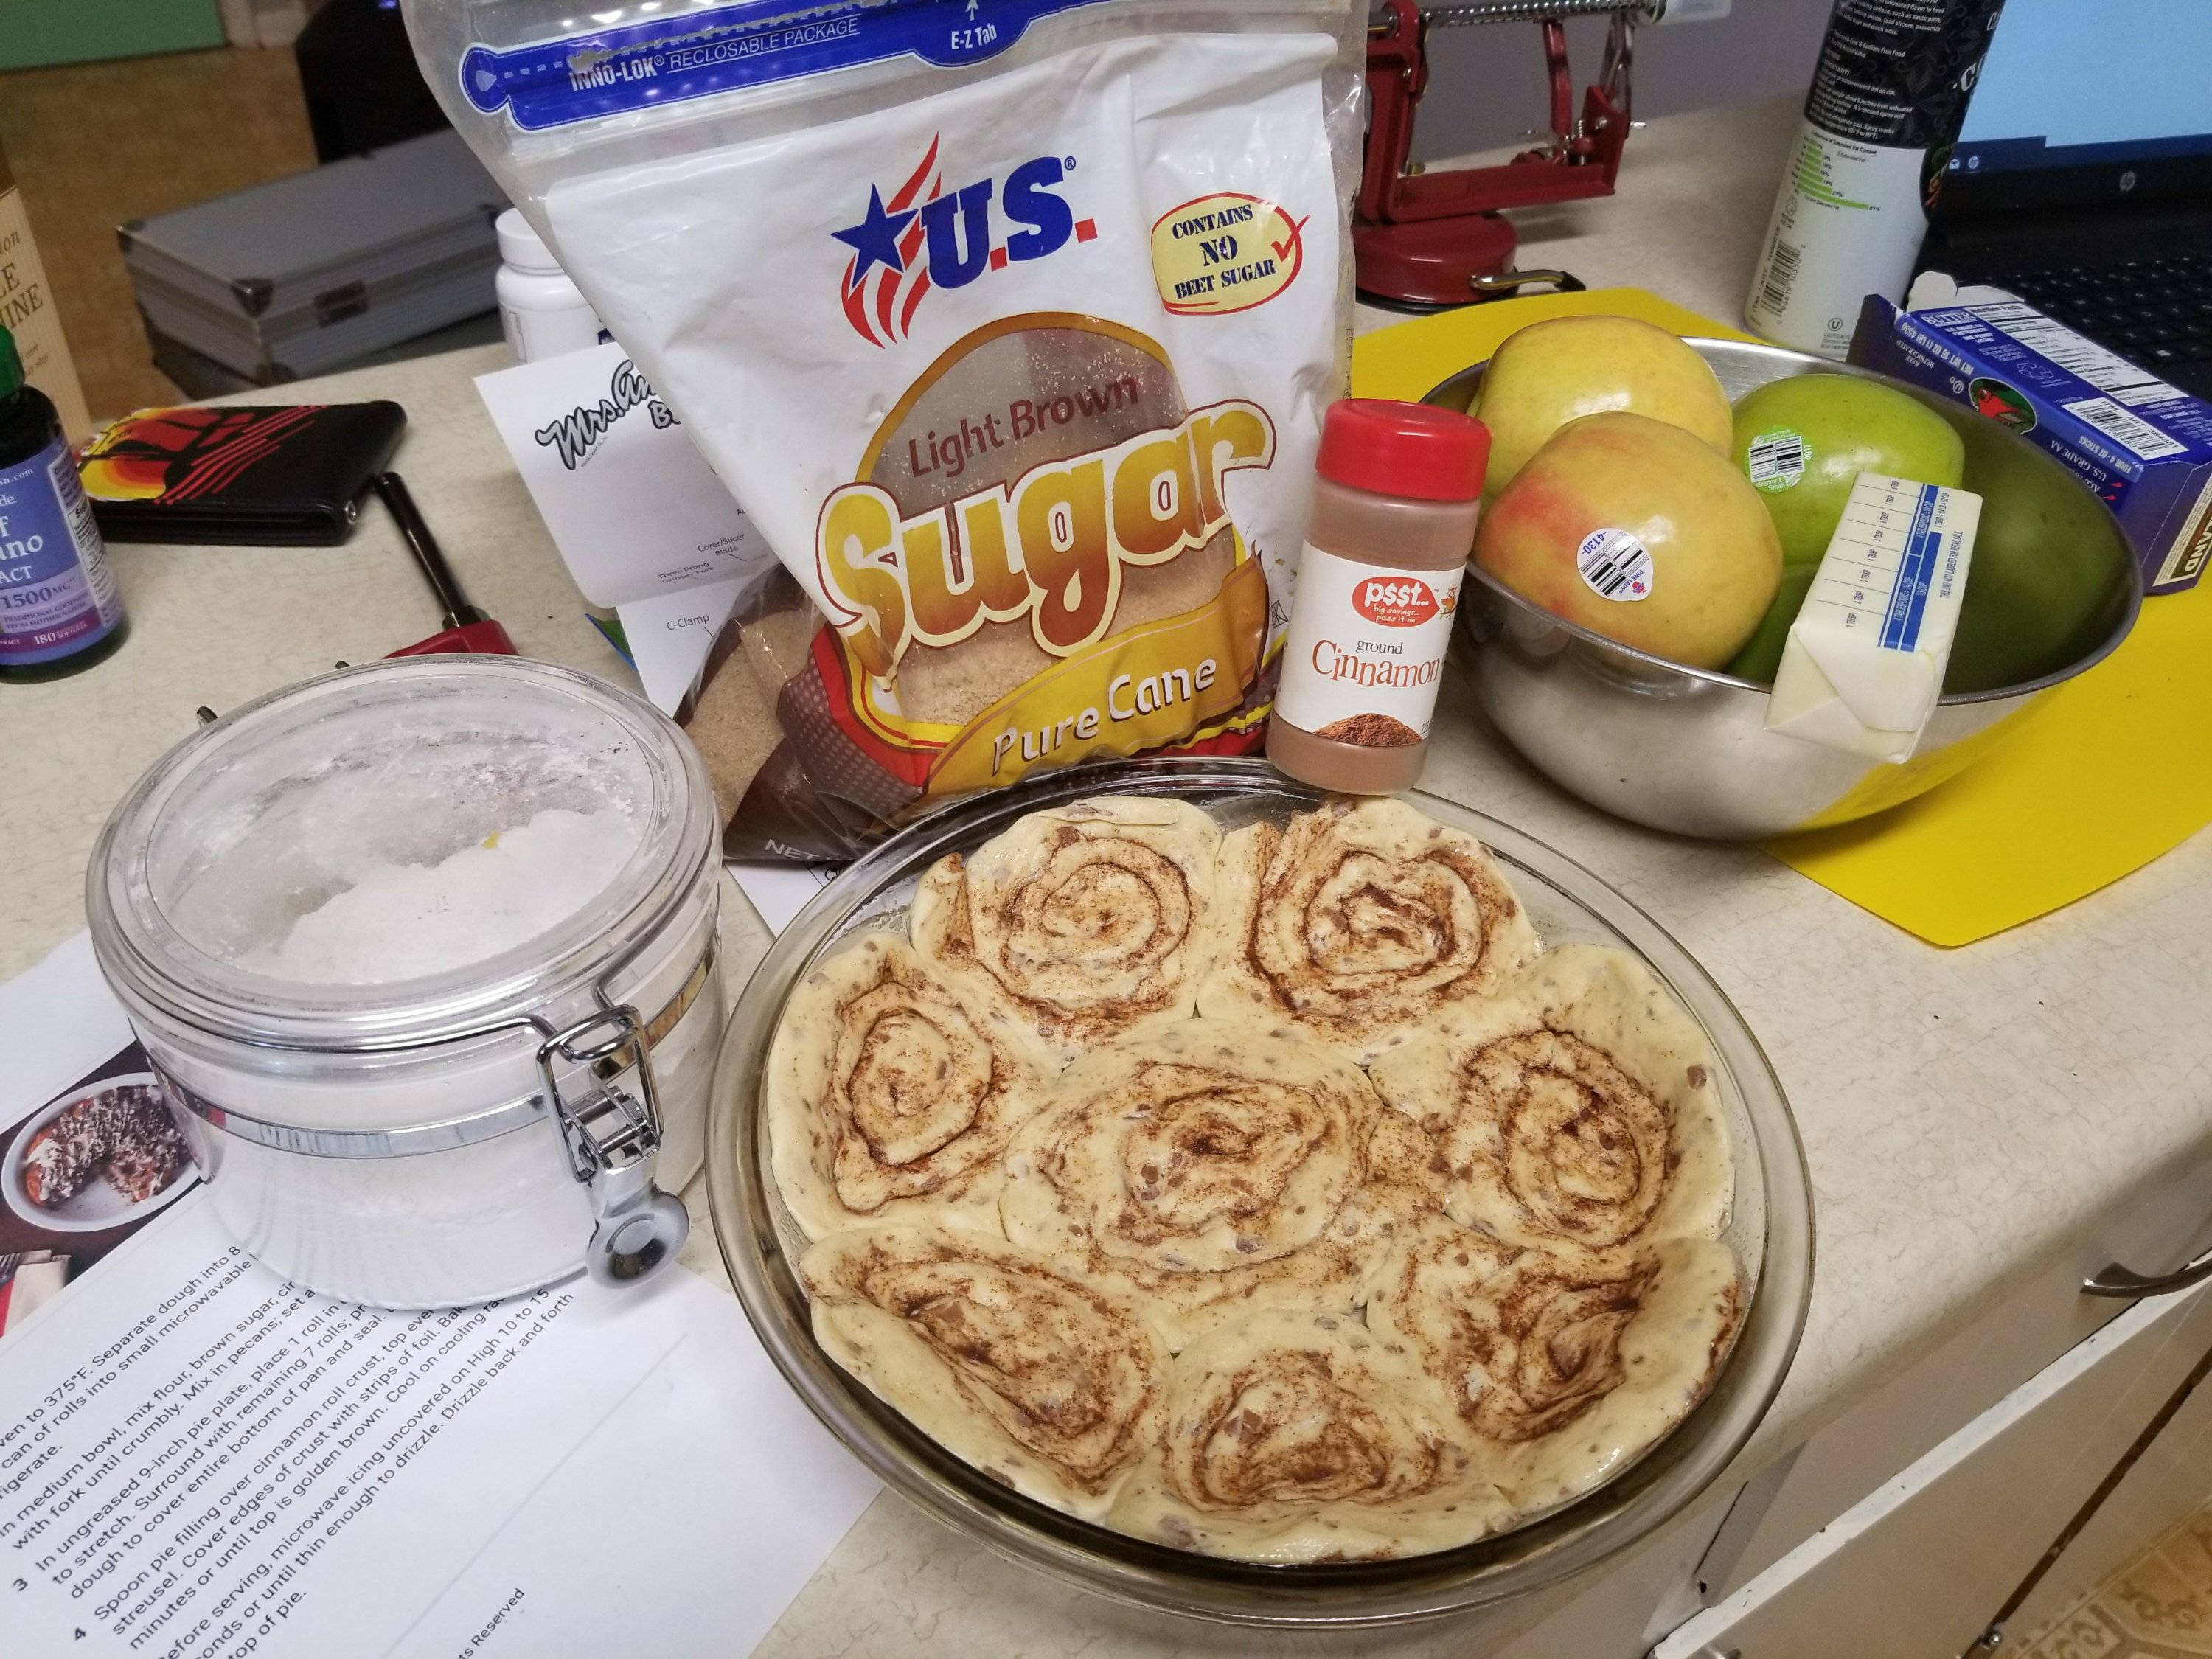
Crust

1 pkg cinnamon bun roll dough (8 count)

Filling

5 apples (I used 2 pink lady and 3 granny smith) peeled, cored and sliced thin

1 tbsp lemon juice

1/4 tsp Nutmeg

1/4 tsp cinnamon

4 tbsp Corn Starch

1/2 cup white sugar

1 cup hot Apple juice

Crumble Topping

1/4 cup flour (packed well)

1/4 cup brown sugar (packed well)

1 tbsp cinnamon

2 tbsp cold butter
Directions

Heat oven to 375

Make filling first

In a large pot, on low heat, put sliced apples in and stir in lemon juice. 

After a few seconds put in corn starch, nutmeg, cinnamon, and sugar. 

Stir until well coated and then add hot Apple juice and keep stirring.

Once the sugar starts to caramelize, take off heat and set aside.

Crust

Place 1 roll in the middle and place the 7 around the outside. Press together and spread until they cover the pan, making sure to press any open seams closed.

Topping

Mix butter, brown sugar, and butter in bowl until in clumps

Put it all together

Pour Apple filling into the cinnamon bun crust and spread to make sure it will fill the crust. 

Spoon the topping evenly above the filling

Bake

Put tin foil around the edge of the pan to avoid burning the crust and place in the oven for 25 minutes 

Take out, let cool and then serve and enjoy!

August 27, 2017: Mike’s Stovetop Popcorn

Popcorn has always been a good memory in my family. Every new years eve, we would lay out blankets in the living room, throw on movies and my dad would make popcorn. I got to share this tradition in a way with my nieces a couple weeks ago and showed them the same way my dad showed me years ago. And now I’ll share with you all


Ingredients

  • 3 qt pot
  • 3 tbsp coconut oil
  • 1/3 cup popcorn kernels
  • 3 tbsp butter
  • Salt to taste
  • 2 paper grocery bags

1. Put coconut oil in pot on medium heat.

2. Toss 2-4 kernels into the pot.

3. When the kernels pop, it means the oil is hot enough. Put remaining kernels in the pot, shake to ensure the kernels are in a single layer

4. Place a kid on the pot and gently shake as the kernels begin to pop to ensure that there is movement and the kernels stay on the bottom to pop

5. Once kernel popping slows down to Approx 10 seconds between pops, pull off the burner.

6. In smaller pan, or in microwave, melt butter.

7. Double up paper bags and dump popcorn into bag. Pour melted butter on top. Add salt.

8. Fold top of bag and shake to your hearts content to coat popcorn with butter and salt.

9. Enjoy!

August 20, 2017: The Deviled Egg Duo. Part 1: Regular Deviled Eggs and Kimchi Deviled Eggs

First off, my deepest apologies for the lack of appetizers for the last couple of weeks. Family we hadn’t seen for a year was in town, and while I had every intention of looping my neices into helping me with an appetizer, it didn’t happen. (We did make homemade popcorn so I mayyyyyy use that in the future) And last Sunday was my husband and my first Anniversary. And quite frankly we were so exhausted from the previous week that we just laid around and did nothing. It was wonderful. But nevertheless, onto this weeks awesome App!

The Deviled Egg Duo. Part 1: Regular Deviled Eggs and Kimchi Deviled Eggs


Deviled eggs are probably one of the first things I learned how to put together after I learned how to hard boil eggs. Always a staple at family events, I eventually got bored and started coming up with combinations to give them different tastes. This week though is my modified taste on 2 different recipes that I have come to love over the years. Regular Deviled eggs, always a classic, and Kimchi Deviled eggs, a very delicious alternative that I discovered after the declicious Kimchi came into my life.

Kimchi, for those who don’t know, is a fermented Napa cabbage with other seasonings that can either be quite spicy or mild depending on what you buy. We used to live by an Asian supermarket that had quite a range available, almost all which I love (I’m a big baby when it gets super spicy, but my husband can pack it away like he was eating the most mild of things without even breaking a sweat- opposites attract don’t ya know)

Carrie verifies the quality of the egg while Boo!Dog watches (please excuse our hideous floor)


Regular Deviled Eggs:

6 eggs, hard boiled (instructions below)

1/4 cup mayonnaise

1 teaspoon yellow mustard

1 teaspoon Paprika

1/8 teaspoon salt

Freshly ground black pepper

Extra Paprika, for garnish

Doctor Pepper optional but always delicious.

Kimchi Deviled Eggs:

6 large eggs, hard boiled (instructions below)

1/3 cups spicy kimchi, drained and finely chopped

1/4 cup mayonnaise

1 tsp Kimchi Liquid

Salt, to taste

Sesame seeds (black or white), for garnish

To boil the eggs

Place 12 large eggs in a pot, fill the water to approx 2 inches above the top of the eggs. Place on Medium-High burner for 30 minutes.

When 30 minutes is up, carefully drain water from pot and begin filling with cold water, dump 6 cups of ice into the pot of cool water. Turn water off and let sit for 15 minutes.

Remove eggs from water and peel shells. The ice bath will help with a smooth removal of the shell.

To make the deviled eggs

Cut eggs in half lengthwise and put the yolk in a bowl. Separate bowls for each type of deviled egg.

Once this is done follow the steps for each type of deviled egg:

Regular Deviled Eggs

Mix mayo, paprika, mustard, salt, and pepper together with the egg yolk until a creamy consistency.

Kimchi Deviled Eggs

Mix mayo, kimchi, liquid, and salt in a blender or food processor until creamy consistency.

Preparation

When mixed, place in a gallon ziploc bag and refrigerate for 30 minutes.

After 30 minutes, cut the corner of the bag at the tip and push filling thru that corner into the empty egg whites.

Top Regular deviled eggs with paprika and Kimchi with sesame seeds

July 30, 2017: Pizza Eggs: Meal and Appetizer

This week’s kinda appetizer was inspired by the show “Weeds”  quite awhile ago. In the first episode they talk about pizza eggs. And so it came to be that I couldn’t find a recipe and made it myself. Leftover pizza, eggs, and cheese, 3 things you are likely to find in my kitchen at any given time. It started as breakfast, then moved to lunch,  and is now a frequent dinner, and in a pinch, when we get surprise guests, it makes a great appetizer!
Pizza Eggs

Ingredients

2 slices of pizza (off a 14″ or bigger pizza)

6 eggs

1 cup cheese

Butter or cooking spray to oil the pan

We had Chicago Style Deep Dish yesterday!

1. Cut pizza into 1/2″ cubes

2. In bowl whisk 6 eggs until smooth and well combined

3. Mix pizza cubes into egg mixture and coat well.

4. Let sit for 15 minutes

5. Head pan on medium and add butter or cooking spray if not a nonstick pan

6. Add egg and pizza mixture to the pan and stir until eggs are set and firm, be careful to not burn

7. Sprinkle cheese over eggs and let melt. Mix together

8. Take off heat and serve. Tastes amazing in tortillas taco or burrito style, you can even serve with tortilla chips for something a little different!

Now you may be expecting a picture of a delicious app here but here is the thing. Not everything comes out looking the way I want it to. This time, too much red sauce gave everything an unappealing pinkish tinge. Something that only tends to happen with Chicago Style Pizza. But still try it. It’s delicious! 


July 23, 2017: Double Decker Taco Dip

I want to thank everyone for hanging tight last weekend. I was extremely uhnder the weather so making an app was the last thing on my mind. But here we are this week with a new app!

DOUBLE DECKER TACO DIP


Ingredients:

2 cups sour cream

32 oz refried beans

2 packets Old El Paso Zesty Sour Cream mix

Leftover taco meat (optional)

Handful Shredded Lettuce

2 cups cheese, cheddar or cheddar jack mix

Toppings such as black olives, onions, tomatoes, avocado, salsa, etc


1. Half the sour cream, cheese, refried beans, and taco meat

2. Put half of the refried beans in the bottom of your dish and even it out with a spatula.

2. Mix 1 packet zesty sour cream mix and half of the sour cream. Layer that next.

3. Layer half of the taco meat

4. Layer half of the cheese (add any additional layers you might like such as guacamole, salsa etc)

5. Repeat steps 2-4

6. Top off your dip with a handful of shredded lettuce, and any toppings you want.

6. Refrigerate for at least 30 minutes for the layers to set and cool and then serve with tortilla chips and enjoy!

July 9, 2017: Zucchini Fries

First off, thanks to everyone for hanging tight for the 4th of July weekend. I had many plans to accomplish and did none of them, but my oh my was I relaxed at the end. Second, I want to give a shout out to my mother whose birthday it is. (And I hope she doesn’t mind this because she told me she didn’t want me talking about her on the internets).

Today’s recipe I actually made on the 4th as a side dish to our dinner but it was so good that I had to use it and share it here!

Our 4th of July dinner: Beer Brats cooked in Left Hand Brewery Nitro Milk Stout (So good) and Jalapenos, Potato Salad (store bought, not so good) and the delicious Zucchini Fries with Ranch for dipping.

Zucchini Fries

*One out of Two needed eggs
Ingredients

3 Zucchini

2 cups Breadcrumbs 

2 eggs

Ranch for dipping
Recipe

1. Preheat your oven to 425

2. Cut the Zucchini: cut off each end slice down the middle and then slice each chunk length wise.

3. Now cut the slices into 3 chunks lengthwise

4. In a separate bowl, mix 2 eggs well.

5. Put 2 cups of breadcrumbs in a separate bowl

6. Dip each zuchinni piece into the eggwash and then the breadcrumbs, fully coating them, then set on a baking sheet. Repeat for all pieces.

7. Bake at 425 for 23-25 minutes, until golden brown.

8. Enjoy with a dip of your choice, I like ranch dressing.

June 25, 2017 : Steak Bites with “Bloody Cassidy” Sauce 

Guyyyyssss. Tonight is the premier of Preacher. I’ve been on my toes all day waiting,  I’m so insanely excited. And the excitement bubbled over to the recipe!

First let me say, my husband makes some epic Bloody Mary’s,  and when I think about steak I think about drinking one of them with it. So the idea slowly formed and then researching the first episode of “Preacher” it hit. Bloody Cassidy. Of course and so… The sauce was born! 

Steak Bites with Bloody Cassidy Sauce

*picture missing steak sauce and srirracha
Ingredients

1 1/2 lb steak of your choice, I used ribeye

1 cup alcohol free Bloody Mary Mix

6oz Tomato Paste

2 tablespoons Steak Sauce (such as A1)

1 tablespoon Srirracha (optional) 
1. Cut steaks into 1/2 inch cubes. Place frying pan on stove, if non-stick use oil or butter to keep from sticking

2. Place steak cubes in pan and rotate sides until they are fully cooked to your preference.

3. In microwavable bowl mix tomato paste, bloody Mary Mix, steak sauce, and srirracha, Stir well

4. Microwave for a minute and a half, place paper towel over bowl to keep down splashing in the microwave.

5. Plate and enjoy

On a super side note, my dog really approves of this recipe.

June 18, 2017: Pizza Pockets

This week’s delectable appetizer came as a moment of nostalgia. See I grew up in the suburbs of Chicago where we had this thing called a Pizza Puff. A deep fried pizza deliciousness. And while I knew I couldn’t recreate it, I knew I could create something unique from the same idea.

The Pizza Pocket

Ingredients

Mozzarella cheese

1 Pillsbury Crescent Dough Sheet (Makes 4)

Pizza Sauce

Pizza Toppings of your choice

1tbsp Butter

1/2 tsp Garlic Powder.
Recipe

1. Heat oven to 375. Unroll the crescent dough sheet o to a cold flat surface, I used my cutting board

2. Cut into 4 squares (one cut down the middle in each direction.

3. In the middle, put pizza sauce, cheese, and toppings all to your liking.

4. Fold in half. Use fork to press down the edges of all the open ends to seal closed

5. Melt butter in small bowl and mix with garlic powder.

6. With basting brush, brush the butter mixture over the top of each pocket.

7. On a nonstick sheet pan, or a sheet pan lined with nonstick foil, place the pockets, leaving space between them

8. Bake at 375 for 15-17 minutes or until the top is golden brown.

9. Take out. Plate. Enjoy!
Until next week!

June 11, 2017 – Taco Burger Sliders

First off, I want to thank everyone for the great response to my initial recipe. It is so exciting to be off to a great start and I am hoping to keep up the momentum. This weeks appetizer will be consumed a day early. My husband is off to a guys night to see Dave Chapelle. He is very aware that I am watching Fear the Walking Dead without him. His loss. And I’m having a girls night with the pups- Boo!Dog and Carrie. Painted nails, good food and lounging around… And ice cream for dinner. Lots of ice cream.


Tonight’s recipe is Taco Burger Sliders. Inspired by a dish that my awesome sister, Ann, makes (Taco Burgers). You may say “But burgers, isn’t that a meal” and I’ll respond, “That’s why [insert various higher power of your choice or science] made sliders!” Mini delicious burgers.


Ingredients

3/4 lb ground beef

6 Kings Hawiian Dinner Rolls (Or a dinner roll of your choice)

3 leaves of Lettuce

2 small tomatoes

Cheese for 6 sliders, we used Quesadilla Mexican Melting Cheese

1/4 cup sour cream

1 packet of taco seasoning

Peppers and onions *see note on step 11.


  1. Prepare the Sour Cream Mix, mix together 1/4 cup of sour cream and 1/4 a packet of taco seasoning. Mix well and put bowl in fridge to keep cool.
  2. Mix ground beef and remaining taco seasoning. Once well mixed, portion out into 6 small patties (pretend you are making meatballs then smush them)
  3. Push a thumbprint into the middle of each patty and place on stove, or grill.
  4. Cook thoroughly. Top with cheese if you would like and melt.
  5. While cooking, prep your buns, if not halved, slice each bun in half long-way.
  6. On the top half of each bun, put a small amount of sour cream mix and spread.
  7. Place cooked slider patty on bottom bun
  8. Top with 1 slice of tomato and 1 slice of lettuce
  9. Place top bun on
  10. Enjoy to your hearts content!
  11. *in the image you will see sauteed onions and peppers. They are a delicious addition however they are slippery and hard to eat so I left them out of the recipe. You can add if you want!